Sunday, November 23, 2014

Details 5: Charms, Bits, and Gears


I've been hoarding charms, scrapbooking items, and gear shapes from Amazon and craft stores for use in detailing structures, whether they be Medieval, Steampunk, Modern, Sci Fi, or whatever. Professor Harrison discovered my stash and decided to share the best of them for your entertainment. He's that kind of a guy.

Note: I had to prop up some of the packaging to avoid reflections when photographing.
 
First off we have "eCrafty 1153". Holding his pipe, our Professor sees valve handles, lampshades, planters, a RADAR dish, and other intricate detail goodness coming out of this bag. Well, he would if he turned around.


Next we have my favorite bits from a "Pepper Lonely 30pc Antique Bronze" bag. I especially like the wing above the Professor's head (for a Viking tent or standard?) and the two skulls would be nice in a voodoo setting. Plus I'm sure his wife and kids will find use of the remaining "girly" bits (not shown).


Nice bits from "eCrafty 1152" (there is at least one of each still in the bag). The largest is concave and would make a great Shield of the Giants. Unfortunately, I haven't found much use for the remaining stampings in the bag. Yet.
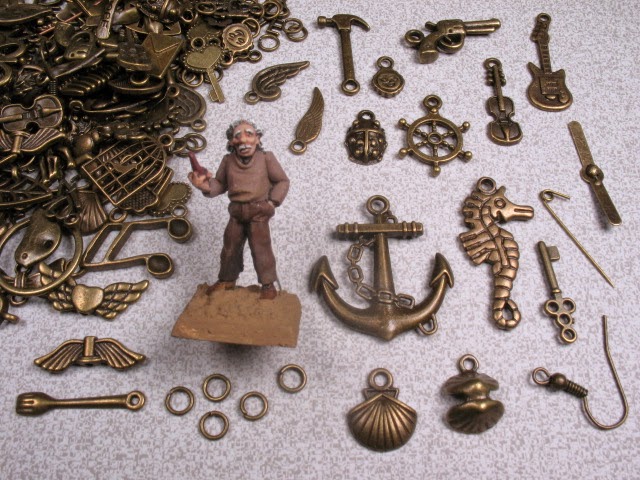
 
The best so far, the excellent "Pepper Lonely 100pc Antique Bronze" batch. Unique bits like musical instruments, a hammer and a pistol. Ahoy! The nautical pieces would look great on some grog shop on a wharf, right matey? More of the same are in the bag although there's plenty left to give to the fairer sex.
 
From "Bead Landing 90pc Gears". Three shapes with three finishes each: steel, copper, brass. This is a few of the larger 25mm diameter pieces that come in the package…
 

… and here are the smaller 16mm diameter "gears". So many the Professor is getting dizzy.
 
I've had these for some time and didn't write down their info. I think they're from the Tim Holtz Ideaology series. Professor Harrison concurs.
 
"Spare Parts 456608 Vintage Gears" (left) and "647941 Mini Gears" (right). They're beautiful, thin stamped metal 30mm and 20mm in diameter and will make really nice windows.   BONUS: Packaging will make paint mixing cups once opened.
 

"Forum Novelty Steampunk Bag of Gears 66452". I especially like the large brass bit above the Professor's head as it would make a great window. Or maybe it's part of some kind of oh-so-important mysterious thermometric paragnostic astronavigational device. Or… (I can smell your brain already working on a use. Don't deny it!) The two little wheels to its right and the one below the label are also brass. The gears themselves look to be to be cast resin. Not shown, there's another complete set in the bag.
 
Lastly, we have "Steam Age Industrial Gears and Handwheels (O gauge and HO gauge) from Vector Cut". Also available are nuts/bolts, padlocks, tools, furniture, flowers, grating, and LOTS more! Even hamburgers, hot dogs and doughnuts! Although as thin as card these are beautifully detailed and quite useful. Look like they belong inside a gear-driven Steampunk contraption of some sort. HIGHLY RECOMMENDED. 
 
Hopefully, seeing all these really cool bits will spark your imagination as much as they've sparked mine!


Sunday, November 9, 2014

Derelict Building 5: Terraining the Base

With the main shell glued in place and the removable side plugged in it's time for some terrain on the base. I made the balconies, set them in place, marked and taped off their locations where they would be glued to the base. I then added terrain to the base with Vermiculite, a few rocks, pebbles, lichen, plastic plants (Dollar Store), and such. Sealed everything with thinned matte medium, glued the balconies in place, added terrain at their base connection points.

Patio by front door made from Hirst castings.

Inside the barn. Notice I painted where the removable side sits before I added any terrain and there is a door on the left that leads into the main building.

All of the barn doors are removable.

THAT'S IT! Quite an involved project indeed!

LESSONS LEARNED:

When making multi-floor buildings I should have worked the design and construction TOGETHER. I didn't and had to make a lot of changes as I went along. Not only did I have to adjust each removable floor to match pre-cut doors, the barn's upper storage floor didn't align with any of them (so MORE adjusting!). Also, don't have awkward-to-get-at small rooms!

Saturday, November 1, 2014

Derelict Building 4: A Solution

TAA DAA! I made the right side removable!

At each corner "plug in pin blocks" (wood craft beads with dowel in one and a corresponding hole in its mate) were glued on. Lift the side to remove, plug in to install.

I knew it wouldn't be long before the blocks broke off from use so I drilled tiny holes from the outside through the blocks, screwed in tiny screws, and drilled out any screw parts that blocked the holes with my Dremel tool. I then filled in and painted the screw holes on the outside. All extra work but worth it for the strength.

With the removable side temporarily in place I glued the rest of the shell to the base.

 Here are more views of the inserts in place. MUCH easier to get at things on any level when any inserts above it are removed.

Attic.

Second floor.

First floor.

Ground floor.

While searching for treasure, a couple of thugs move a fallen cupboard out of the way and discover a large hidden hole in the floor. Wonder where it leads?   "I ain't goin' in there! YOU go first!"   "No way, pal! YOU go first!"

NEXT: Terrain and what I learned

Friday, October 24, 2014

Derelict Building 3: Overhead Interior Views

The finished third and second floor inserts. They had to be individually made to line up with their corresponding door openings. Added terrain scatter using wood bits and accessories. Dirt debris is Vermiculite. Thinned matte medium was then painted on to seal everything and "dust" was quickly sprinkled on (I milled some Vermiculite in an old coffee grinder). Finally, a watered down coat of gray was painted on for more aging.

The inside of the building was painted a neutral Gray, then given a heavy charcoal wash (blotted with tissue) and drybrushed a neutral gray/Barnwood mix. Hirst Dirt was scrubbed on where each floor insert meets its walls.  

Finished inserts from above:

Attic and barn upper storage.

Second floor.

First floor.

Ground floor. Difficult to reach down 150mm to get at that figure coming in the front door. Was I able to solve the problem when I put the building together and glued it to the base?

NEXT: Oh yeah!
 

Saturday, October 18, 2014

Derelict Building 2: Construction


The basic construction was the same as Chumley's so I'll just highlight a few things.
 
I cut out the shell pieces, decided on opening windows and doors. Added timbering as well as a semi-destroyed section (see METHODS: Walls 3), which was then sprayed gray.

 
Rest of the outside of the building was primed flat black. I temporarily taped everything together to get an idea of what it would look like. Hmmmm…. the bottom (rear) end has 9mm inside clearance but the far (front) end has only has 4.5mm clearance. Methinks this is going to be a major problem for gamer fingers to get into.

 
Gray spackle added to outside (METHODS: Spackling) and final exterior colors were painted.

 
THE ROOF: Cut the pieces, adding damage holes. On the underside I added some vertical rafters…
 
…then flipped the pieces over and added thin strips so when I glue on the horizontal cross battens they'll be at the right level.
  
Battens added as well as most of the shingles. Trimmed the shingles, painted the battens, connected the two roof pieces together and weathered the whole thing (no photo).
  
For stair supports I nailed some MDF pieces together and cut them out. I cut door openings and/or other cuts to each as I went along.
 
NEXT: Overhead views of the floors.


Monday, October 13, 2014

Derelict Building 1: A Quick Tour


This building ended up being quite challenging and frustrating at times. The design started out as just a narrow single story long building but then I got "creative", making it derelict, adding multiple floors, and a "notched" end. Anyway, let's take a little walk around it, shall we?

Overall view. All of the doors and windows open (see METHODS: Hinges 1, slightly updated Hinges 2, and Hinges 3).

Left side.

Under the left side balcony (behind the lower figure) is a door that leads into the barn area.

The front. It doesn't really tilt, just my mediocre photography.
 
The right side.

The rear. The brickwork is covered in Methods: Walls 1.

Top view (main door on left end)


NEXT: Construction highlights.

Friday, April 18, 2014

Large Euro Barn 4: The Finale

The action continues…

Mister Ree confronts Higby Bunko, unaware another thug approaches from behind. But Our Hero escapes… for the moment.
 

Director Priess goes over the upcoming tack room scene with his cameraman.

Tack room "door" is simply a rug photo from a catalog. The catwalks are permanent but the loft's center floor and tack room ceiling are removable.
 

Gareth goes over a scene with Toots Shreeker and Martin Blatherson (who plays Higby Bunko).
 

All of these bits and more were made using Hirst Arts molds #57, 58, 59, and 85.
 

Non-Hirst. Craft barrels, plastic chair, woodpile from a dowel (DETAILS 2) and homemade stool.
 

The final action scene takes place near the horse stalls. Mister Ree defeats the villains once again and…
 
MDF stalls were cut, painted and glued in place.

 
… the police finally show up, arrest the thugs, and release Patty Melt. Unfortunately, Higby Bunko manages to escape and speed away but fear not, Mister Ree is hot on his tail. THE END.     Or is it?

 
FILMCO STUDIOS would like to graciously thank Biff Liftim and crew of The Roof Removal and Helicopter Company for their arduous work during the overhead photography sessions of this film.

Sunday, April 13, 2014

Large Euro Barn 3: A Thrill a Minute


Heiress Patty Melt has temporarily escaped the clutches of lead villain Higby Bunko and hidden in a corner of the loft.
 
Gareth Priess discusses her upcoming love scene with Cheeselips the Rat (enthusiastically played by Mickey Squeekers). Immediately after the discussion, actress Toots Shreeker (Patty Melt) required a costume change.

Outside, Hero Mister Ree arrives in his Reemobile…
(A Corgi '30 Batmobile)

…climbs through a loft door searching for Patty Melt…

…but encounters a couple of thugs instead, who are handily defeated during the fight scene.
 

A quick lunch break is taken during which actress Toots Shreeker (Patty Melt) and actor Neal Down (Truman Gadfly/Mister Ree) take part in a short promotional film.

 
Barn and loft doors were made and attached (Hinges 2). Handles are wire glued to small bits of wood.

 
Mickey Squeekers celebrates his scene. Unfortunately the editors had to cut his performance from the film, deeming it too risqué for sensitive tastes.
 
------ NEXT: Bits and Police ------